Build a Cedar Planter Box This Weekend: Under $50, Ready for Spring

Alright, here's the deal—if you want to get your garden started early this year, you need a planter box. And not one of those flimsy plastic things from the big-box store that warps after one season. I'm talking about a solid cedar planter that'll last you five, six, maybe ten years if you take care of it.
I built four of these last spring. One for tomatoes, one for herbs, and two I gave to my neighbors because they kept asking about them. Total cost per box? About $45 if you use cedar from the home center. Under $30 if you go with pressure-treated pine (though cedar is worth the extra money).
This is a Saturday morning project. Two hours, maybe three if you're measuring twice and cutting once like you should. Let me walk you through it.
What You'll Need
Materials:
- 2×6 cedar boards (or pressure-treated pine) — 3 boards at 8 feet long
- 2×2 cedar boards — 1 board at 8 feet
- Exterior wood screws (2.5 inch) — about 20 screws
- Landscape fabric — 1 roll (you'll use a small piece)
- Staples or small nails for the fabric
Tools:
- Circular saw or miter saw
- Drill/driver
- Tape measure
- Speed square (for marking cuts)
- Staple gun or hammer
Budget: $45-50 for cedar, $25-30 for pressure-treated
Time: 2-3 hours
Difficulty: Beginner — if you can measure and screw, you can do this
Cut List
From your 2×6 boards, cut:
- 4 pieces at 24 inches (these are your box sides)
- 4 pieces at 30 inches (these are your box ends)
From your 2×2 board, cut:
- 4 pieces at 6 inches (corner posts)
Pro tip: Cedar is expensive right now—lumber prices are nuts. If you're building multiple boxes, buy longer boards and plan your cuts to minimize waste. A 10-footer might be cheaper per foot than an 8-footer.
How to Build It
Step 1: Build the Box Frame
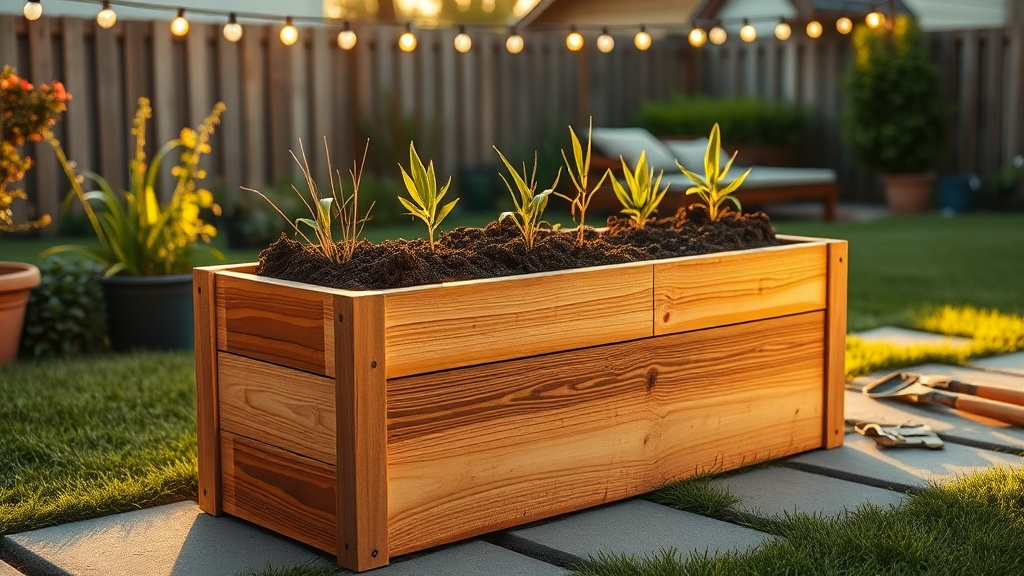
Lay out two 24-inch pieces and two 30-inch pieces in a rectangle. The 30-inch pieces go on the outside, the 24-inch pieces butt up between them. This gives you a box that's roughly 30×24 inches on the outside.
Drill pilot holes (don't skip this—cedar splits easy) and screw the corners together with two screws per corner. Use 2.5-inch exterior screws.
Step 2: Add the Corner Posts
Those 6-inch 2×2 pieces are your legs and corner supports. Screw one into each corner, flush with the bottom of your box frame. This lifts the whole thing off the ground so the wood doesn't rot sitting in wet soil.
Don't skip this: That gap underneath is critical. I built my first box sitting flat on the ground and the bottom boards rotted out in two years. Lift it up six inches and it'll last five times longer.
Step 3: Add the Bottom
You've got two options here:
Option A (my preference): Cut a piece of 1×6 or 1×4 cedar to fit across the bottom, leaving gaps between boards for drainage. Screw it in from the outside.
Option B (cheaper): Staple landscape fabric across the bottom instead of a solid floor. This drains well but you'll need to be careful when moving the box full of soil.
If you go with Option A, drill a few 1/4-inch holes in the bottom boards for drainage.
Step 4: Line It (Optional but Recommended)
Staple landscape fabric to the inside walls, especially if you're growing food. This keeps the soil from direct contact with the wood and extends the life of your box. It also prevents any treatment chemicals (if you used pressure-treated) from leaching into your vegetables.
Step 5: Fill and Plant
Fill with good potting mix—not garden soil, which gets too compacted in containers. You're looking at about 4-5 cubic feet of soil to fill this box.
Pro tip: Mix in some compost if you've got it. Your plants will thank you.
Common Mistakes
Don't use drywall screws. They'll rust out in a year. Spend the extra two bucks on exterior-grade screws.
Don't skip the drainage. I've seen people build solid-bottom boxes and wonder why their plants drowned. Water has to get out.
Don't build it too big. This 30×24 size is perfect—you can reach the middle from either side. Go bigger and you'll be climbing into your planter to weed.
Maintenance
Cedar weathers to a nice silver-gray over time. If you want to keep the color, hit it with some exterior wood oil every couple years. But honestly? The weathered look is fine. It's a planter box, not fine furniture.
Every spring, check the screws and tighten any that have loosened. Wood expands and contracts with moisture.
Why This Project Is Worth It
I built my first one of these five years ago and it's still solid. I've built probably twenty since—for clients, for family, for the school where Lisa teaches. It's the perfect gateway project. If you can build this planter box, you can build a raised garden bed. You can build a simple bench. You start here and you build confidence.
Plus, there's nothing like walking out to your backyard in May, grabbing a handful of fresh basil you grew yourself, and knowing you built the box it came out of.
You can do this. Seriously. Grab your drill on Saturday morning.
This post contains affiliate links. If you buy through these links, I earn a small commission at no extra cost to you. I only recommend products I've actually used.