Build a Rain Garden Before the Next Big Storm: A No-BS Suburban Drainage Fix

Build a Rain Garden Before the Next Big Storm: A No-BS Suburban Drainage Fix
A lot of backyards are not messy because owners are careless. They’re messy because rainwater has nowhere to go. Puddles collect by the driveway, mulch washes into the garden beds, and your patio looks okay for a day and soggy the next.
You can fix most of that with a rain garden, and you don’t need a 10,000-square-foot landscape redesign. You need a shallow depression, right location, and the patience to keep a few plants alive for a couple seasons.
Here’s the version I’d give a real neighbor who wants it done and not overbuilt.
Why I recommend a rain garden in a normal suburban yard
You build a rain garden for one reason: to catch runoff at the point it’s generated and let the soil absorb it over time. Instead of letting water race to the curb, sink it where the water lands.
A basic rain garden solves three recurring problems:
- Foundation-adjacent puddling after hard rain
- Mud and algae streaking from bare patches
- Constant cleanup after storms because water keeps flowing through high-use areas
If you have this happening in your yard, a rain garden is one of the few upgrades worth the effort.
First rule: site it like a practical drainage system, not a decoration
Rain gardens are often designed from online photos, not logic. That’s how people end up with beautiful dead plants and still wet lawns.
Your test is simple: during a hard rain, where does water naturally want to go?
Look for two things:
- A low point that collects runoff
- Space at least 25–40 inches wide and at least 10–20 feet long (can be smaller if your lot is tight)
Do not put a rain garden in the middle of a walking path unless you want a seasonal puddle sculpture. Place it next to a downspout zone, side yard, or a gentle low strip.
If you’re in a neighborhood with strict lot boundaries, map your runoff route first and make sure you’re not pushing water toward neighbors. That is the fastest way to get yelled at and eventually reroute the whole thing.
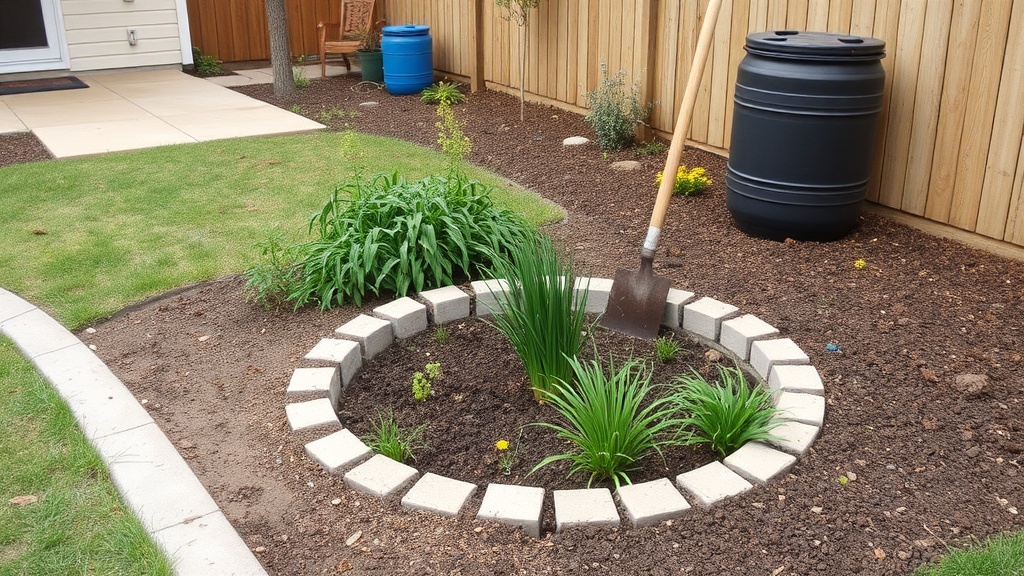
Step 1: Draw your footprint and get the math right
I keep this dead simple:
- Measure your contributing area (the surface area feeding runoff into the spot): drive strip + lawn patch + patio edge.
- Start with a rain garden basin area equal to roughly 10% of that catchment area.
- Depth target: 6–12 inches, with 6 inches as a safe starting point for most homes.
That 6–12 inch range is important. Too shallow and you’re just making a decorative dip; too deep and you’ve built a trench no one can maintain.
A useful shortcut: if your soil tests as slow (clay), make the opening a little shallower and wider than your first estimate. If your soil is very sandy, slightly deeper is okay.
Step 2: Excavate with a purpose, not perfection
You do not need a machine. You need clean cuts and an eye on grade.
I usually remove the top 6 inches and shape a basin with:
- Flat bottom where plants will sit
- 3:1 side slopes (3 horizontal inches for every 1 vertical inch), so edges are safe and mows are possible
- A deeper center than edges by about 1–2 inches
You’re basically building a place that holds a burst of water, then lets it disappear within about 24 hours.
If the hole doesn’t drain at all after a hose test (pour a measured bucket of water and watch it), don’t panic and don’t pour in more fill. Open your drainage logic:
- Add a drainage layer mix into the basin only, not everywhere
- Improve water flow with graded edges
- Confirm there’s no hardpan directly under the basin bottom
Step 3: Build the soil profile (this is where most people skip and fail)
A lot of backyard guides stop at digging and mulch and call it done. That’s where we get dead plants.
Use this blend in the basin:
- About 60–65% native soil
- About 35–40% coarse compost
You’re not creating raised garden soil. You’re making a medium that stays wet but not swampy. Too much compost and the zone compacts when wet. Too much clay and roots drown.
Mix deeply in one pass. If there are clods, break and rework them. If you see standing puddles from your hose test after 30–45 minutes, you probably need more drainage mix in the basin floor.
Step 4: Pick plants that can take “wet when wet, dry when dry”
No rain garden is permanent if you pick the wrong plants. My rule: pick plants by zone and by tolerance.
Choose 8–12 plants total for a small first build.
Core layers:
- Front edge: practical grasses and low perennials that tolerate sun and brief wet feet
- Middle: moisture-loving plants that can handle shade transitions
- Center: deeper roots for stability and water handling
A practical starter list:
- Blue flag iris for visual structure
- Blue-eyed grass for low maintenance at the edge
- Swamp milkweed for a middle-height anchor
- Joe-pye weed in wetter corners
- Black-eyed Susan where soil is slightly higher and drier
If you have deer pressure, avoid too much tender foliage. Pick tougher natives if that’s your issue.
Spacing is simple: don’t crowd. Let plants establish airflow and root spread. This also buys you forgiveness if one species takes longer to settle.
Step 5: Mulch, plant, and keep it simple for season one
Mulch depth: 2 inches, not a mulch blanket.
- Too little mulch: soil dries and weeds jump in.
- Too much mulch: plants suffocate and water reaches soil slower than it should.
Plant on a cool day if possible. Water thoroughly right after planting. Then keep soil moist for 2–3 weeks. Don’t drench like a swamp every day after that. Let nature test it, then adjust.
This is the only week I give as my “attention period.” If plants survive that period, they usually survive the build.
Maintenance: what keeps it honest
Rain gardens are not one-and-done.
You need to do four things in year one:
- Inspect after major rain for erosion channels.
- Pull weeds before they dominate.
- Replace dead plants as needed, not all at once.
- Check drainage each fall and remove built-up sediment in the basin center.
At the end of the first year, you should see:
- shorter puddle time after storms
- less soil run-off on edges
- less “muddy stripe” from the downspout path
You’ll also likely realize the area is nicer than you expected. People underestimate how much a functional landscape project can clean up a yard’s look.
Budget reality check (because no one should pretend this is free)
Typical DIY rain garden cost for a modest suburban lot:
- Excavation labor (DIY): $0 in labor, about one full Saturday if you’re focused
- Topsoil and compost mix: $70–$150
- Plants (basic mix): $80–$220
- Mulch: $20–$50
- Optional edging/labor support extras: $0–$120
Total: usually $170 to $540 depending on materials and how much you buy in bulk.
If this sounds high, you can start smaller: a 20–30 square foot feature with one deep basin and add fill-in plants later. The best rain garden is the one you actually finish.
Common mistakes I see in this exact build
I see these all the time, including on my own sites:
- Building near a tree drip line and expecting roots not to take over.
- Over-excavating and creating a pit your mower won’t avoid.
- Putting too many expensive plants in at once.
- Treating it like a flowerbed instead of a drainage tool.
If you need a one-line project rule, use this:
Plant for function first, beauty second.
When a rain garden won’t work
Don’t force this if:
- The lot has steep, uncontrollable runoff
- Soil is contaminated and needs remediation first
- Your location has severe access/easement restrictions
In those cases, a French drain or professional engineer review may be smarter than DIY earthwork.
For many of us, though, this is a straightforward first landscape project that pays back in cleaner water flow and less storm stress.
My bottom line
You don’t need perfect design software or a landscape crew. You need a shovel, a hose test, and a little follow-through. A correctly placed rain garden does three jobs at once: it handles runoff, improves garden function, and can actually look intentional if you don’t overcomplicate it.
If you are debating whether to do a bigger retaining style fix, ask one question first:
- Do you know where your water is coming from, and where it needs to go?
If yes, this build is worth your weekend.
If no, draw it first, then start digging.