Building a DIY Rain Barrel System That Actually Collects Water

Why Does My Rain Barrel Overflow Instead of Filling Up?
If you've ever installed a rain barrel and watched it overflow during a light drizzle—or worse, sit bone dry during a downpour—you're not alone. Most store-bought barrels fail because they're missing proper intake systems, adequate overflow routing, and secure connections. This guide shows you how to build a rain barrel setup that actually works—one that fills efficiently, won't flood your foundation, and can expand as your garden grows.
Rain harvesting isn't complicated, but there's a difference between sticking a barrel under a downspout and building a system that captures hundreds of gallons reliably. After twenty years of building outdoor projects—and hearing from neighbors about their failed DIY attempts—I've learned what separates functional systems from weekend-wasting headaches. The good news? You can build a proper setup with basic tools, about $150 in materials, and one free Saturday.
What Supplies Do I Need for a Working Rain Barrel System?
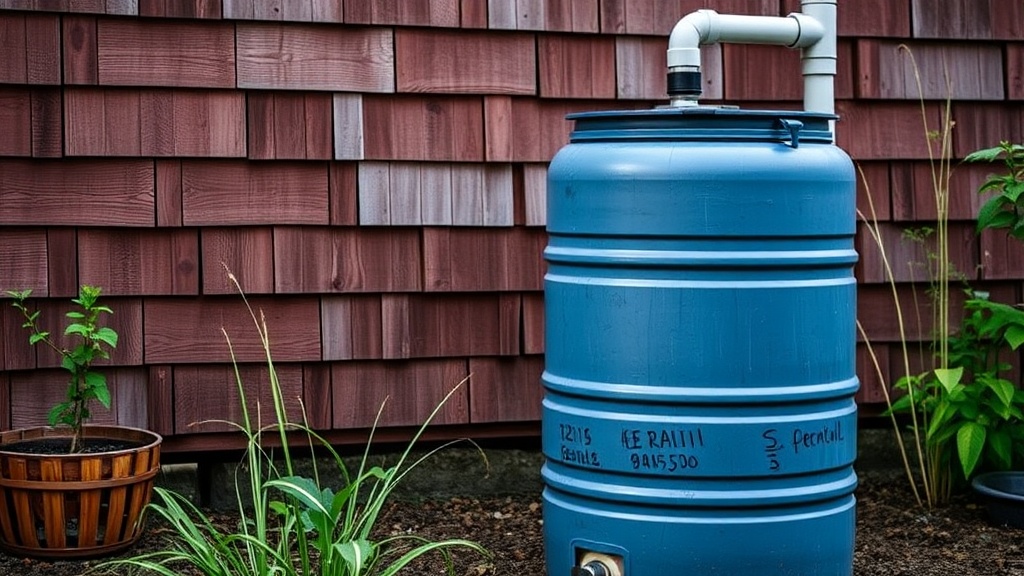
Skip the thin plastic barrels that crack after one winter. You want food-grade HDPE barrels—the kind used for shipping liquids like soda syrup or cooking oils. Restaurants and food manufacturers often give these away or sell them cheap. A 55-gallon barrel gives you serious capacity without becoming impossible to move.
Here's your complete shopping list for a single-barrel system:
- One 55-gallon food-grade barrel—check Craigslist, Facebook Marketplace, or local restaurants
- Brass hose bibb (¾-inch) with rubber washers
- Waterproof bulkhead fitting—same ¾-inch thread size
- Flexible downspout diverter kit or a section of flexible corrugated downspout
- Window screen (fiberglass or aluminum) for mosquito-proofing
- Overflow hose—1¼-inch diameter, at least 6 feet long
- Concrete blocks or pressure-treated 4x4s for elevating the barrel
- Silicone caulk rated for outdoor use
A word on elevation: your barrel needs to sit at least 12 inches off the ground. Water won't flow uphill, and every foot of height increases your spigot's pressure. Two stacked concrete blocks (16 inches total) gives you decent flow for filling watering cans or connecting a soaker hose.
How Do I Install the Spigot Without Leaks?
This is where most DIYers mess up. They drill a hole, thread in a plastic spigot, and wonder why it drips constantly. The secret is the bulkhead fitting—a two-piece connector that sandwiches the barrel wall between rubber gaskets.
Here's the proper sequence:
- Measure up 2–3 inches from the barrel bottom and mark your spot. Any lower and sediment will clog your line; any higher and you're wasting capacity.
- Drill a hole using a spade bit or hole saw that's sized for your bulkhead fitting (usually 1⅛ inches for ¾-inch fittings).
- Insert the bulkhead fitting from the inside out, with the rubber gasket against the interior wall. Hand-tighten the exterior nut, then give it another quarter-turn with channel-lock pliers—but don't overtighten and distort the gasket.
- Wrap the hose bibb's threads with plumber's tape and thread it into the bulkhead fitting. Position the spigot handle facing outward for easy access.
Test your connection before you fill the barrel. Pour a gallon of water inside and check for drips. A slow seep now becomes a puddle later—fix it with fresh plumber's tape or additional silicone around the exterior fitting.
What's the Best Way to Connect the Downspout?
You've got two options here: a diverter kit or a direct cut-in. Diverter kits cost $30–$50 and include an overflow mechanism that sends excess water back down your downspout when the barrel's full. This protects your foundation and keeps your barrel from turning into a geyser during storms.
To install a standard diverter:
- Cut a section from your downspout—usually about 9–12 inches—using tin snips or a hacksaw.
- Install the diverter box in the gap you created, following the manufacturer's pitch angle (usually 2–3 degrees toward the barrel).
- Connect the included flexible hose to your barrel's intake port.
Want to save money? Cut your downspout about 4 inches above the barrel lid and use a flexible accordion downspout extension directed into a screened intake hole. This works fine, but you'll need to manually route overflow with a hose—more on that next.
For detailed installation diagrams and regional rainfall calculators, the EPA's Green Infrastructure Guide provides excellent technical resources. The University of Minnesota Extension also offers a comprehensive rain barrel construction manual with material specifications for cold climates.
How Do I Handle Overflow Without Flooding?
This is the question that separates functional systems from disasters. An inch of rain on a 1,000-square-foot roof generates over 600 gallons of runoff. Your single barrel holds 55 gallons—do the math.
Every rain barrel needs two exits: the spigot (for use) and an overflow (for safety). Install a second bulkhead fitting near the top of your barrel—about 3 inches below the rim. Connect your 1¼-inch overflow hose and route it at least 10 feet from your foundation, preferably toward a garden bed, rain garden, or storm drain.
Some builders install multiple barrels in series—connecting the overflow from barrel one into the intake of barrel two. This doubles your storage without adding downspout complexity. Just make sure your platform can handle the weight: water weighs 8.3 pounds per gallon, so two full barrels approach 1,000 pounds. A stack of cinder blocks on compacted ground handles this fine; wooden pallets rot and collapse.
Can I Expand This System Later?
Absolutely—and you should. Most homeowners start with one barrel, realize how much water they're capturing, and want more. The modular approach I described above lets you daisy-chain barrels indefinitely (well, until your platform fails or your spouse complains).
For larger gardens, consider upgrading to an IBC tote—the 275-gallon white cube containers used for shipping industrial liquids. Same principles apply: bulkhead fittings, screened intake, overflow routing. One IBC tote replaces five standard barrels and gives you serious irrigation capacity.
Don't forget winterization if you live where temperatures drop below freezing. Drain your barrel completely, disconnect the diverter (reconnecting your downspout directly), and store the barrel upside-down to prevent ice damage. A frozen barrel doesn't crack from the ice inside—it cracks when expanding ice pushes against a rigid bottom that can't flex.
Your plants prefer rainwater anyway—no chlorine, no fluoride, pH balanced by nature. And during summer watering restrictions? You'll be the neighbor with green tomatoes while everyone else's gardens crisp. The system pays for itself in about two seasons if you're paying municipal water rates, and the satisfaction of watching that barrel fill during a thunderstorm never gets old.