Building a Heavy-Duty Raised Garden Bed Frame

You're going to learn exactly how to build a sturdy, long-lasting raised garden bed frame that won't rot or bow out under the weight of wet soil. This guide covers material selection, structural reinforcement, and the step-by-step assembly process required to build a bed that lasts more than one season.
Most folks grab a few pieces of cheap pine, some nails, and call it a day. But here's the thing: soil is heavy. When you add water, that weight increases exponentially. If you don't build your frame to handle that pressure, you'll be back at the hardware store in two years when your boards start bowing or rotting. We're doing this right the first time.
What type of wood should I use for raised beds?
Don't just grab any lumber you see on sale. You need wood that can handle constant moisture without falling apart. While pressure-treated lumber is an option, many gardeners prefer naturally rot-resistant woods. Cedar and redwood are the gold standards here. They have natural oils that keep the rot away, and they look much better in a backyard setting. If you're on a tighter budget, look for redwood scraps or even high-quality locust wood.
If you do decide to go with pressure-treated wood, make sure it's rated for ground contact. Nowadays, the chemicals used in treated lumber are much safer than the old stuff, but if you're growing vegetables, I still suggest lining the inside of the bed with a food-grade liner. This adds an extra layer of protection for your plants and your peace of mind. You can find more info on wood safety and standards through the EPA website regarding modern treatment processes.
What are the best dimensions for a raised bed?
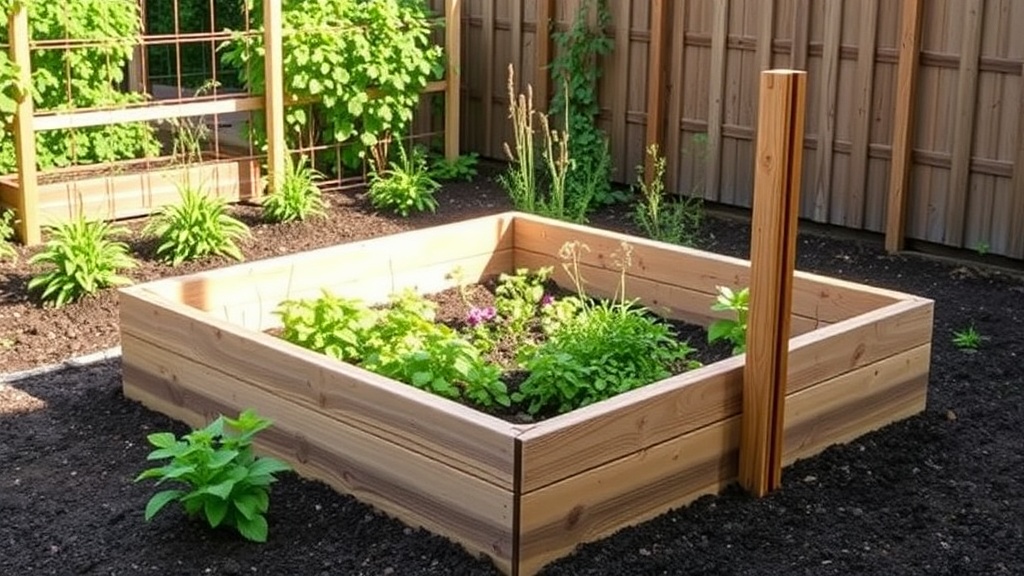
This is where people usually mess up. You want a bed that's deep enough to accommodate root growth but not so wide that you can't reach the middle. I always tell my neighbors to keep the width to 4 feet or less. Why? Because you should be able to reach the center from either side without stepping into the bed. Stepping on the soil compacts it, which ruins the drainage and makes it harder for roots to move. If you make it too wide, you'll end up with a dead zone in the middle where nothing grows well.
For the height, 12 to 18 inches is usually the sweet spot for most vegetables. If you're growing deep-rooted plants like carrots or even certain types of fruit trees, you might want to go a bit higher. Just remember: the deeper the bed, the more soil you'll need to fill it, and that adds up in cost. Plan your volume before you start buying dirt.
How do I prevent the sides from bowing out?
This is the biggest headache in garden construction. As the soil gets wet, it pushes against the walls of your bed. Without reinforcement, those boards will start to bulge outward. To prevent this, you need more than just corner posts. You need cross-bracing or center stakes.
- Corner Posts: Use 4x4 posts in every corner. These act as the anchor for your side boards.
- Center Bracing: For beds longer than 6 feet, drive a piece of rebar or a sturdy stake into the ground in the center of the bed. This provides a middle point for the boards to rest against.
- Hardware: Don't use standard nails. Use exterior-grade, heavy-duty screws. Nails eventually pull out as the wood expands and contracts with the weather.
A solid frame should feel heavy and immovable. If you can wiggle the boards with your hand, it's not strong enough. I usually recommend using a 2x12 for the side boards if you want something substantial, but 2x6s stacked two high work just fine if you use plenty of structural screws.
Where should I place my raised beds?
Location is everything. You need a spot that gets at least 6 to 8 hours of direct sunlight. If you put your beds in the shadow of your house or a large tree, your vegetables won't have the energy they need to produce. Also, pay attention to the drainage of your yard. You don't want your beds sitting in a low spot where water pools during a heavy rain. A little bit of elevation helps, but a well-built bed can handle a lot of moisture if the soil mix is right.
One thing I've learned from years of building these: check your utility lines before you start digging for posts or braces. It's a simple step, but it saves a massive headache. You can contact your local utility locator service to ensure you aren't about to hit a water line or an electrical cable. For more general gardening advice and site preparation, the extension services at various universities offer great resources on soil and sun requirements.
Once you have your location and your materials, the assembly is straightforward. Start by cutting your boards to length. I like to use a square to make sure every cut is straight—even a slight angle can create a gap that lets soil leak out. Lay out your pieces on a flat surface, screw the corner posts to your side boards, and then lift the frame into place. Once it's sitting where you want it, drive your center braces in. This is the part where you see if your craftsmanship holds up to the weight of the world.
| Material Type | Durability | Cost Level | Best Use |
|---|---|---|---|
| Cedar | High | Moderate | Vegetable Gardens |
| Redwood | High | High | Decorative Gardens |
| Pine | Low | Low | Temporary/Seasonal |
| Pressure Treated | High | Moderate | Hardscaping/Fencing |