How to Build a Simple Outdoor Shower

Alright, here’s a project I get asked about more than you’d think.
Outdoor showers.
If you’ve got a pool, hot tub, garden, muddy kids, sandy feet, or a dog that thinks every puddle is a personal invitation… an outdoor shower becomes ridiculously useful.
And the good news is you don’t need a plumber and a $4,000 Pinterest setup to make one.
You can build a simple outdoor shower in a weekend with basic tools and a few pieces of lumber.
Let me walk you through it.
Step 1: Pick the Right Location
Choose a spot with:
- good drainage
- some natural privacy
- easy access to water
Popular locations include near pool decks, beside fences, or in a corner of the yard close to a garden hose connection.
Make sure water will drain away from your house foundation.
Step 2: Set the Posts
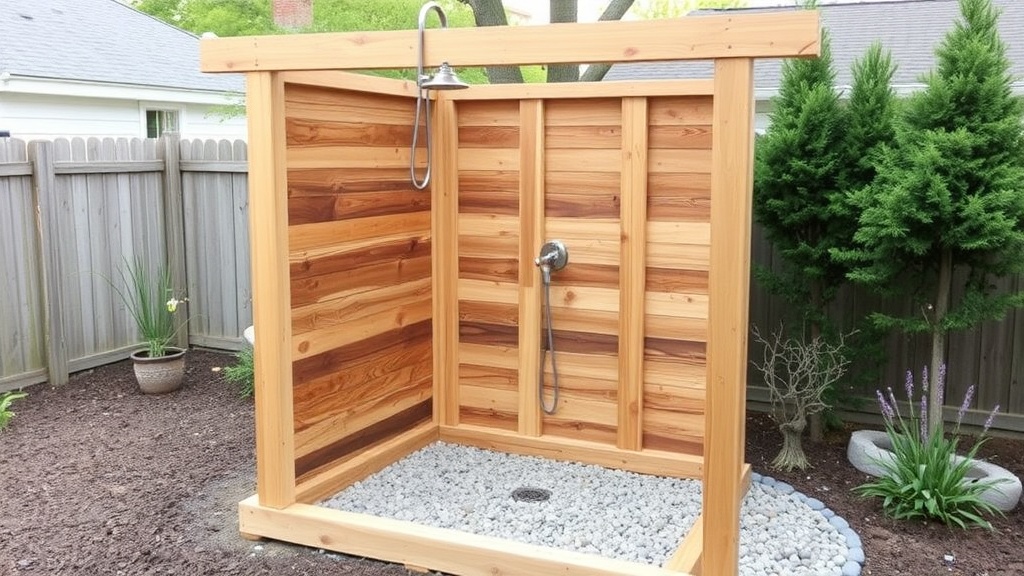
This structure is basically a small privacy wall with a shower head attached.
Install two or three pressure‑treated 4x4 posts depending on the layout.
Typical setups:
- two posts for a single privacy wall
- three posts for an L‑shaped corner shower
Dig holes about 18–24 inches deep, set the posts, and secure them with concrete or compacted gravel.
Use a level so everything stays straight.
Step 3: Build the Frame
Connect the posts using 2x4 horizontal framing boards.
A simple layout works best:
- one board near the top
- one in the middle
- one near the bottom
This creates a sturdy frame for attaching the wall boards.
Step 4: Install the Privacy Boards
Cedar fence boards work great for outdoor showers.
They hold up well outside and look good even if you don’t stain them.
Attach boards vertically using exterior screws.
You can place boards tight together for full privacy or leave small gaps for airflow.
Step 5: Install the Shower Fixture
There are two simple water options.
Option 1: Garden Hose Connection
The easiest setup uses a hose‑to‑shower adapter.
Just run a hose to the wall, mount the shower fixture, and connect it.
Option 2: Permanent Plumbing
For hot and cold water, run plumbing from the house to an outdoor shower valve.
That requires more plumbing work but uses the same shower structure.
Mount the shower head about 6.5–7 feet high.
Step 6: Create a Drainage Base
Outdoor showers need good drainage.
Dig a shallow area under the shower and fill it with gravel or drainage stone.
Water will soak into the ground instead of creating mud.
Optional upgrades include:
- pavers
- wood decking
- teak shower mats
Step 7: Add Simple Finishing Touches
A few small additions make the shower more useful:
- towel hooks
- small shelf for soap
- a step or bench
- solar path lights
Planting around the base also helps it blend into the yard.
Common Mistakes to Avoid
- skipping drainage planning
- mounting the shower too low
- using hardware that rusts
- forgetting privacy
Final Thoughts
Outdoor showers sound fancy but they’re actually a straightforward build.
A couple of posts, some cedar boards, and a water connection—and you’ve got a backyard feature that gets used all summer long.
Perfect for rinsing off after swimming, cooling down on hot days, or keeping muddy chaos outside.
It’s a solid weekend project.
You can do this. Seriously.