How to Pressure Wash Your Deck the Right Way

Alright, so here's the deal with pressure washing a deck.
A lot of people either baby it with a garden hose or go the other direction and blast the thing like they're stripping paint off a truck. Both are wrong.
Done right, pressure washing cleans the grime, mildew, and winter gunk off your boards and gets the wood ready for stain or sealer. Done wrong, you carve lines into your deck that you'll stare at for the next ten years.
I've been doing mine every spring for a long time now. Same routine: pull everything off the deck, clean it, let it dry a couple days, then reseal it before the summer cookouts start. Takes a Saturday if you don't rush it.
Let me walk you through it.
Step 1: Prep the Deck
Before you even touch the pressure washer, clear the area.
Move your grill, chairs, planters, toys—everything. You want a completely open surface so you're not working around stuff.
Then do two quick things:
• Sweep the deck so you're not blasting loose dirt everywhere
• Cover nearby plants with a light tarp or plastic if you're using deck cleaner
This whole step takes maybe 20 minutes, but it saves you headaches later.
Step 2: Choose the Right Pressure Washer
You do NOT need a commercial gas machine for most decks.
For the average homeowner, the Sun Joe SPX3000 electric pressure washer is a great pick. Runs about $190 on Amazon and it's more than enough power for routine deck cleaning.
If you've got a big deck or you're doing a lot of outdoor projects, step up to the Simpson MegaShot 3200 PSI. That's usually around $400 at Home Depot, gas powered, and it chews through bigger jobs.
Both work great. The key is using the right pressure—not maxing the machine out.
Step 3: Set the Correct PSI
Deck wood is softer than you think. Too much pressure and you'll gouge it.
Here's the rule of thumb I follow:
• Softwoods (pine, cedar): 1,200–1,500 PSI
• Hardwoods or composite: up to about 2,500 PSI
If you're unsure, start lower. You can always increase pressure a bit. You can't un‑damage wood.
Step 4: Use the Right Nozzle
This is where people mess up.
Use a 25‑degree fan tip nozzle. That spreads the spray wide enough to clean without cutting into the boards.
Do NOT use a 0‑degree nozzle on a deck. That's the laser-beam tip. It will absolutely carve lines into your boards.
I've seen decks that look like someone attacked them with a chisel because of that nozzle.
Skip it.
Step 5: Apply Deck Cleaner First
Pressure alone won't break down mildew and gray weathering.
Spray on a cleaner first and let chemistry do the work.
Two solid ones I use:
• Mold Armor E‑Z Deck Wash – about $12 at Home Depot
• Olympic Premium Deck Cleaner
Spray it on, let it sit for about 10–15 minutes, but don't let it dry out. Then you're ready to wash.
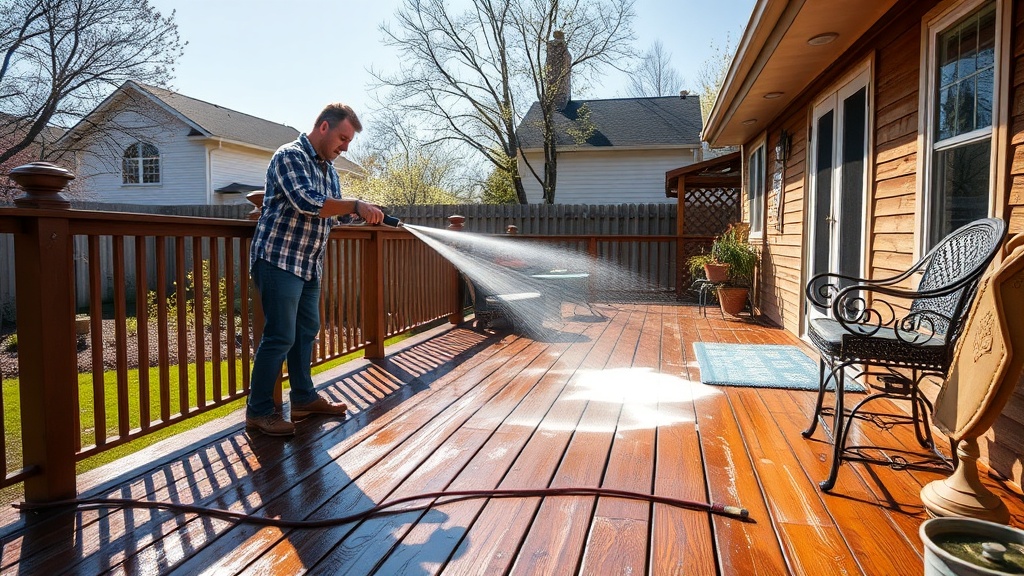
Step 6: Pressure Wash with Proper Technique
Now the actual washing part.
Hold the nozzle about 6–8 inches from the deck surface.
Then follow three simple rules:
• Spray with the grain of the wood
• Keep the wand moving
• Overlap each pass slightly
Think of it like mowing the lawn. Slow, steady passes across the boards.
If you stop in one spot or get too close, you'll leave a mark.
Take your time here. This part of the job usually takes me about an hour for an average deck.
Step 7: Let the Deck Dry
This part matters more than people think.
Let the deck dry for at least 48 hours before staining or sealing. The wood needs time to release the moisture from washing.
If you rush it, the sealer won't soak in properly.
Step 8: Seal or Stain the Deck
Once it's dry, protect the wood.
Two products I've had great results with:
• Cabot Australian Timber Oil – excellent if you want rich color and deep penetration
• Thompson's WaterSeal Advanced – solid water protection and easy to apply
Roll it or brush it on with the grain and let it cure before putting furniture back.
My Spring Deck Routine
Every April, right when the weather turns decent, I knock this out.
Furniture comes off Friday evening. Saturday morning I clean it, pressure wash it, and let it dry the rest of the weekend. Monday evening I usually seal it.
Whole deck looks brand new again and it's ready for grilling season.
And the best part? You're protecting the wood so the deck actually lasts.
Final Thought
Pressure washing a deck isn't complicated—but the details matter.
Use the right PSI, the right nozzle, and take your time with the passes.
Do that and you'll end up with a clean, solid deck ready for another season outside.
You can absolutely handle this one yourself.