Turn Your Old Pallets into a Rustic Vertical Herb Garden

Most people think a vertical garden requires a specialized irrigation system or an expensive modular kit from a big-box garden center.
That is a complete misconception. You do not need to spend hundreds of dollars on plastic tiered planters to grow a lush collection of basil, mint, and thyme. In reality, one of the most effective, durable, and cost-efficient growing structures is sitting right behind your local grocery store or warehouse: the wooden shipping pallet. A well-constructed pallet garden provides excellent drainage, utilizes vertical space that would otherwise go to waste, and adds a rugged, architectural element to your backyard or patio.
However, you cannot simply grab any pallet you see lying on a sidewalk and start planting. There is a significant difference between a pallet designed for heavy machinery and one designed for food-grade transport. If you use the wrong one, you might inadvertently be growing your organic herbs in chemically treated wood. This guide will walk you through the selection, preparation, and assembly process to ensure your vertical garden is both beautiful and safe.
Step 1: Identifying the Right Pallet (The HT Stamp)
Before you pick up a hammer, you must inspect the wood. Shipping pallets are treated to prevent pest infestations, and the method of treatment matters immensely for a kitchen garden. Look closely at the side of the pallet for a small stamp or stencil. You are looking specifically for the HT (Heat Treated) designation.
- HT (Heat Treated): This is what you want. The wood has been heated to a specific temperature to kill pests, leaving no chemical residue.
- MB (Methyl Bromide): Avoid these at all costs. Methyl bromide is a highly toxic pesticide used to fumigate wood. It is not safe for a garden where you intend to harvest herbs for cooking.
- KD (Kiln Dried): This is also a safe, acceptable option.
If you see a pallet with no stamp at all, or if it looks heavily stained with unknown oils or colorful paints, leave it behind. A clean, HT-stamped pallet is the foundation of a healthy, non-toxic herb garden.
Step 2: Essential Tool and Material Checklist
To complete this project, you will need more than just a screwdriver. You need tools that allow for precision and structural integrity. Gather the following items before you head to the backyard:
- One HT-stamped pallet: Ideally a standard 48" x 40" size.
- Landscape Fabric (Non-woven): This is crucial for creating the "pockets" that hold the soil. Avoid the cheap plastic-y stuff; look for a heavy-duty, breathable fabric.
- Staple Gun and 1/2-inch Galvanized Staples: Galvanized staples are resistant to rust, which is vital since this structure will be constantly exposed to water.
- Utility Knife or Heavy-Duty Scissors: For cutting the landscape fabric.
- Drill and 2-inch Exterior Wood Screws: For reinforcing the frame if necessary.
- Potting Mix: A high-quality, lightweight organic potting mix. Do not use garden soil, as it is too heavy and will compact, suffocating your herbs.
- Sandpaper (60 and 120 grit): To smooth out any rough edges.
Step 3: Preparing the Pallet Structure
Once you have your pallet, the first task is to ensure it is safe to handle. Pallets are notorious for splinters and protruding nails. Lay the pallet flat on your workbench or driveway and run a piece of 120-grit sandpaper over all visible surfaces, especially the edges and the corners where you will be reaching to plant. This prevents scratches to your hands and ensures the wood looks finished rather than discarded.
Next, inspect the interior slats. If any nails are sticking out, use a hammer or a claw tool to drive them flush or pull them out entirely. A single protruding nail can tear your landscape fabric, causing your soil and herbs to spill out onto your patio mid-season. If the pallet has large gaps between the slats, you may want to screw in a few extra scraps of wood to create more "pockets" for your plants.
Step 4: Lining the Pallet with Landscape Fabric
This is the most critical step for the longevity of your garden. You are essentially building a series of internal pouches that will hold the weight of the wet soil. If you skip this or use low-quality fabric, the weight of the soil will cause the fabric to sag and eventually burst.
- Layout the Fabric: Lay the pallet flat on the ground. Take your roll of landscape fabric and drape it over the back and the bottom of the pallet. You want enough excess fabric to wrap around the sides and into the gaps between the slats.
- Create the Pockets: Instead of one continuous sheet, I recommend creating individual "pockets" for each horizontal slat. This prevents a single tear from ruining the entire garden. Fold the fabric into the gaps between the slats, creating a "U" shape.
- Staple Securely: Using your staple gun, staple the fabric to the back and the sides of the pallet. Use a heavy-handed approach here—every 3 to 4 inches is a good rule of thumb. Ensure the staples are driven deep into the wood.
- The Double-Layer Technique: For extra durability, I highly recommend a double layer of fabric in the bottom-most sections. The bottom pockets hold the most weight and the most moisture, making them the most prone to failure.
As you work, keep an eye on the drainage. If you find that your fabric is too thick and prevents water from moving through, you might want to check out how to protect your plants from fungus, as trapped moisture in poorly drained vertical gardens can lead to root rot and fungal issues.
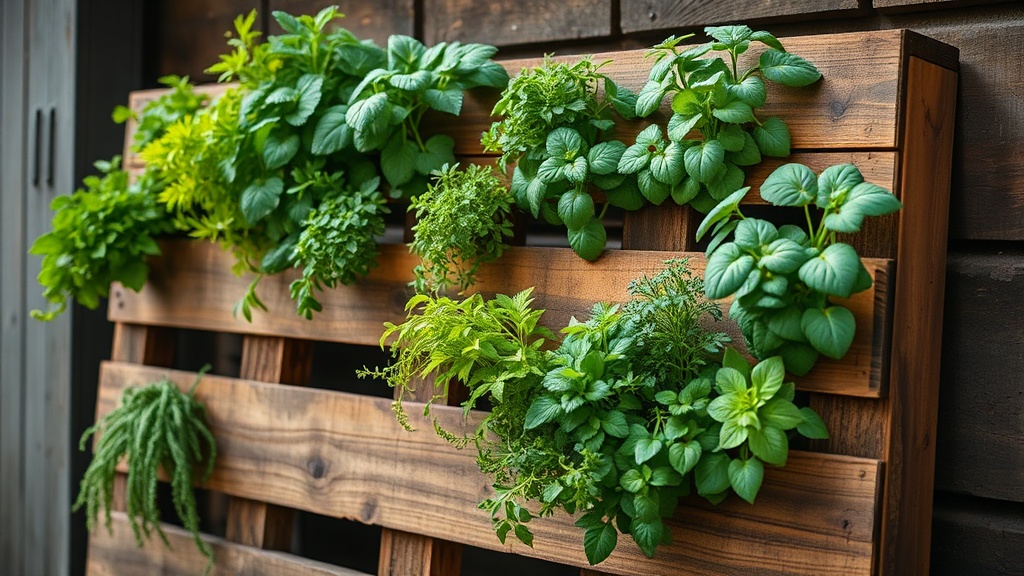
Step 5: Filling and Planting
Now that your structure is built, it is time to bring it to life. Do not attempt to lift the pallet once it is filled with soil; it will be far too heavy and could break your back or the structure itself. Instead, move the pallet to its final location first.
Placement Tip: Position your pallet against a sturdy wall, a fence, or a dedicated wooden trellis. If you are placing it on a patio, ensure the area receives at least 6 hours of sunlight. Most culinary herbs, such as Rosemary, Oregano, and Sage, require full sun to thrive. If you are placing it in a shadier area, consider Mint or Parsley.
- Fill with Soil: Using a small hand shovel or a trowel, pour your potting mix into the pockets. Work from the bottom up. As you fill a pocket, use your hands to press the soil down firmly to eliminate large air pockets.
- Planting Order: Plant your herbs starting from the bottom and working your way up. This allows you to use the weight of the soil in the upper tiers to help stabilize the lower ones.
- Herb Selection: I suggest putting "thirsty" plants like Basil and Parsley in the lower pockets, where moisture tends to settle. Place drought-tolerant plants like Thyme or Lavender in the upper pockets, as the top of the pallet will dry out much faster due to sun exposure and wind.
Step 6: Maintenance and Long-Term Care
Vertical gardens have a unique watering requirement. Because the surface area is exposed to the air on multiple sides, they dry out significantly faster than traditional garden beds. I recommend checking the moisture levels daily during the peak of summer. A quick way to check is to stick your finger an inch into the soil; if it feels dry, it is time to water.
When watering, do not just pour water over the top. This often leads to the water running off the sides without ever reaching the roots in the middle pockets. Instead, use a watering can with a long, narrow spout to direct water directly into each individual fabric pocket. This ensures the moisture penetrates deep into the root zone.
If you notice the wood starting to look weathered or gray after a season, don't be afraid to give it a light sanding and a coat of a non-toxic, water-based exterior sealer. This will protect the pallet from rot and extend the life of your garden by several years. If you find your plants are struggling with nutrient depletion, you can even incorporate some organic matter, similar to how one might use coffee grounds for rose bushes, to boost the nitrogen levels in your herb soil.
Summary of Pro-Tips
Before you head to the hardware store, remember these three rules for a successful build:
- Always check the HT stamp: Never use a pallet treated with Methyl Bromide (MB).
- Prioritize the fabric: Use heavy-duty, non-woven landscape fabric and staple it frequently to prevent sagging.
- Manage your drainage: Place drought-tolerant herbs at the top and moisture-loving herbs at the bottom.
Building a vertical herb garden is a great way to reclaim your space and add a touch of functional art to your outdoor living area. It’s a project that rewards patience and attention to detail, and once it's finished, you'll have a fresh supply of herbs right at your fingertips for every meal.
Steps
- 1
Prepare and Sand the Pallet
- 2
Line the Compartments with Landscape Fabric
- 3
Secure the Fabric and Add Soil
- 4
Plant Your Favorite Herbs