Why Your Garden Needs a Dedicated Composting Station

A pile of kitchen scraps, coffee grounds, and dried leaves sits in a corner of the yard, waiting to be processed. Without a dedicated station, these organic materials often end up in a plastic trash bin, destined for a landfill where they produce methane. A dedicated composting station turns that "waste" into black gold—the highest quality organic matter you can add to your garden. This post covers why a structured composting system is a fundamental tool for any serious gardener, the different types of setups you can build or buy, and the mechanical principles required to make it work efficiently.
The Practical Benefits of On-Site Composting
Most people think composting is just a way to reduce trash, but for a gardener, it is a production facility. When you compost on-site, you are creating a customized soil amendment tailored to your specific garden needs. Instead of buying bagged organic matter from a big-box store, you are recycling your own nitrogen and carbon cycles right in your backyard.
One of the biggest advantages is the impact on soil structure. Composted organic matter improves soil tilth, meaning it helps sandy soils hold onto water and helps clay soils drain more effectively. If you have noticed that your vegetables are stunted or your perennials are struggling despite regular watering, it is often a sign of poor soil biology. You can learn more about these issues in our guide on why your garden soil might be the reason your plants are struggling.
Furthermore, a dedicated station prevents the mess of "loose" composting. When people just throw scraps in a pile on the grass, it attracts pests like rodents and creates an eyesore. A structured bin or tumbler keeps the process contained, manages odors through controlled aeration, and makes it much easier to harvest the finished product when your cedar raised bed garden is ready for planting.
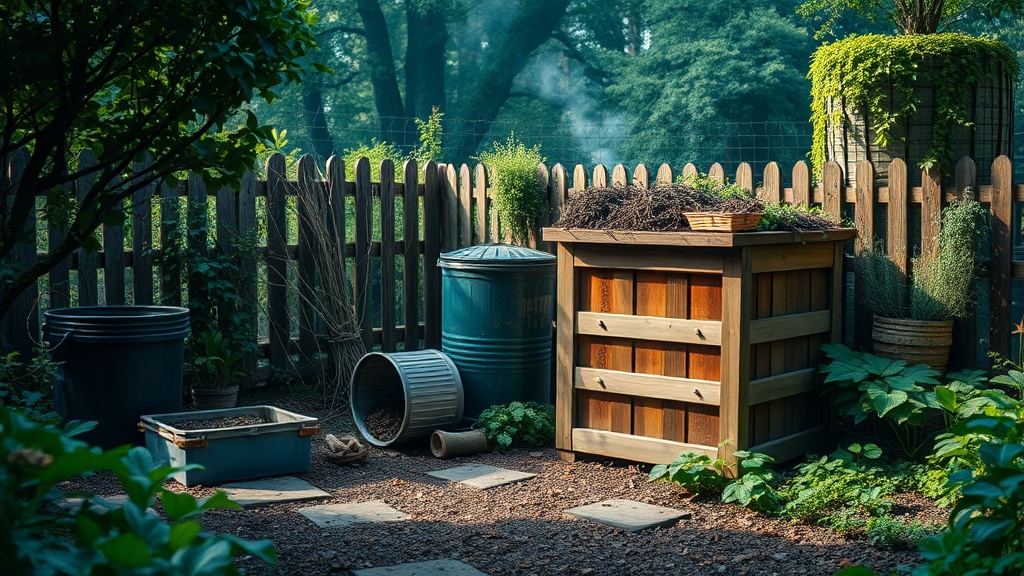
Choosing Your Composting Method
There is no single "right" way to compost, but there is a right way for your specific backyard layout and time commitment. As a contractor, I look at these systems through the lens of durability and ease of maintenance. Here are the three most common setups.
1. The Backyard Bin (Static Pile)
This is the simplest method. You can buy a heavy-duty plastic bin, like those made by Envergreen or OXO, or you can build your own using pressure-treated lumber or cedar. A bin is excellent for people who want a "set it and forget it" approach. You layer your materials, let them sit, and turn them occasionally with a pitchfork. The main drawback is that it takes longer to break down because there is less frequent aeration.
2. The Compost Tumbler
Tumblers are sealed containers, often made of high-density polyethylene (HDPE), that are mounted on a steel frame. You rotate the drum to mix the contents. This is the fastest way to get finished compost because it guarantees aeration. If you have a small backyard and want to keep things looking tidy, a tumbler is a great choice. However, they can be more expensive and can sometimes be difficult to turn once the material becomes heavy and wet.
3. The Three-Bin System
This is the professional gardener's choice. You build three adjacent wooden compartments. The first bin is for fresh material, the second is for material that is actively decomposing (the "cooking" stage), and the third is for finished compost that is ready to be used. This allows for a continuous cycle of production. It requires more space and more initial construction work, but it is the most efficient way to manage large volumes of organic waste.
The Science of the Perfect Mix: Greens and Browns
To get high-quality compost, you have to balance two types of materials: Nitrogen (Greens) and Carbon (Browns). If you get this ratio wrong, your pile will either smell bad or simply refuse to decompose. A good rule of thumb is a volume ratio of roughly 3 parts "Browns" to 1 part "Greens."
Green Materials (Nitrogen-Rich)
These are your "wet" materials that provide the protein needed for microbes to multiply. They include:
- Vegetable and fruit scraps: Peels, cores, and ends.
- Coffee grounds: These are excellent, but ensure they are free of any chemical additives.
- Fresh grass clippings: Be careful here; if they are too thick, they can mat together and block air.
- Green plant trimmings: Freshly cut weeds (that haven't gone to seed yet).
Brown Materials (Carbon-Rich)
These are your "dry" materials that provide the energy for the microbes and create the structure for airflow. They include:
- Dried leaves: The gold standard for backyard composting.
- Cardboard and Newspaper: Shredded brown cardboard (remove any plastic tape first) is a fantastic carbon source.
- Straw or Hay: Great for adding bulk and aeration.
- Sawdust: Only use sawdust from untreated wood. Never use sawdust from pressure-treated lumber or cedar that has been chemically stained.
Managing the Mechanics: Air, Water, and Heat
Composting is a biological process, and microbes need three things to thrive: oxygen, moisture, and heat. If any of these are missing, the process stalls.
Aeration: Microbes need oxygen to breathe. If your pile becomes too compacted, it will go anaerobic, which results in a foul, rotten-egg smell. To prevent this, you must turn your pile. If you are using a bin, use a compost aerator tool or a standard garden pitchfork to lift and fluff the material every 1-2 weeks. If you are using a tumbler, give it 3-5 full rotations a week.
Moisture: Your compost pile should feel like a wrung-out sponge. If it is too dry, the decomposition stops. If it is too wet, it will become a slimy, anaerobic mess. If you notice the pile is looking dry, add a bit of water or more "green" materials. If it is too soggy, add more "browns" like shredded cardboard or dry leaves to soak up the excess moisture.
Heat: As microbes break down the organic matter, they generate heat. This is a sign that your pile is working. In a well-managed pile, the temperature should reach between 135°F and 160°F. This heat is crucial because it kills weed seeds and many common pathogens. If you want to be precise, you can buy a long-stemmed compost thermometer to monitor the internal temperature of your bin.
Common Mistakes to Avoid
Even experienced gardeners run into trouble with composting. Here are the most frequent errors I see when I'm out in the neighborhood:
- Adding Meat or Dairy: Never put meat, bones, dairy, or oils in your compost bin. These will attract scavengers like rats, raccoons, or stray dogs, and they will create an unbearable stench.
- Including Pet Waste: Dog or cat feces can contain pathogens that are not destroyed by the standard temperatures of a backyard compost pile. Keep these out of your garden loop.
- Using Diseased Plants: If you have a tomato plant with blight or a rose bush with heavy fungal issues, do not compost it. The heat of a standard backyard pile might not be enough to kill the spores, and you'll end up spreading the disease back into your garden next season.
- Ignoring the Size of Materials: If you throw in a whole pumpkin or a large branch, it will take months—or even years—to break down. Use a knife or garden shears to chop up larger scraps and organic matter before adding them to the bin.
The Harvest: Knowing When It's Ready
The ultimate goal is to produce finished compost. You will know your compost is ready when it looks like dark, crumbly soil and has a pleasant, earthy smell (similar to a forest floor). There should be no recognizable pieces of the original ingredients left. If you still see large chunks of eggshells or twigs, it needs more time.
Once it's ready, sift the compost through a 1/4-inch mesh screen to remove any large, uncomposted bits. These "overs" can be tossed back into your active compost pile to start the process again. Use your finished compost as a top-dressing for your flower beds, mix it into your raised beds before planting, or use it as a nutrient-rich mulch around the base of your perennials. It is the most rewarding way to close the loop in your own backyard.